… and cool Valentine parties at NYC’s Transit Musem (via: Erin). I predict a whole lotta Tuesday morning bus luh on the MTA.
Monthly Archives: February 2011
Northbound Link, 11:45 AM (or, The opposite of uncomfortable)
Southbound Link, 9:45 AM
Don’t let the pigeon ride the subway
I ain’t one to link to random videos on the internets, but I’m making an exception for this (via: my cousin-in-law, Eli, who, unlike Chicklet, is most assuredly not a Mo Willems reader). The video is cute and all, but what caught my attention was the caption.
The passengers of this train have nicknamed this pigeon ‘Henry’ and claim that at least once a week he is seen riding the subway and always walks off at the same exit.
That’s even better than the rooster on the 248.
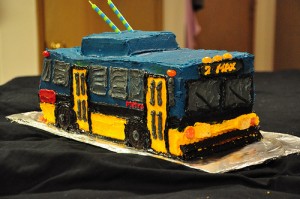
About that bus cake…
I recently chatted (via e-mail) with Nicole McGuire, the woman who made this amazing cake.
Here’s what she had to say about her kid’s bus obsession–and her work of genius:
Max’s love of buses began when he was about a year old with Joe taking him on trips when I was pregnant with our second child and too tired to go out and do anything. For some reason, Max just loved the bus from the start. By the time he was 14 or 15 months old he would literally shake and squeal with delight at the sight of an oncoming bus. He was a late talker, but his third spoken word was “buth!” (he hadn’t even said “daddy” or “mama” yet). We also live close to a busy intersection which services several bus routes, and so buses can be seen and heard at almost any time of the day out our window, so that probably contributed to the fascination.
As far as the cake went, I just wanted to make him something that I knew he would enjoy. He loves buses more than anything — except for Daddy — and I couldn’t make a cake in the shape of Dad. So, I got it in my head that I’d make him a bus cake. I had a vision of what I wanted it to look like, but I didn’t have any models to work from. I bought a book titled “Birthday Cakes for Kids” by Annie Rigg, hoping to find something to work off of. But unfortunately, there was nothing that resembled the image I had in my head. But I thought, “hey, how hard could it be?” and decided to take her cake recipe, thinking it would be sturdy enough to withstand shaping. It was; it worked beautifully.
Nicole was also generous enough to share her recipe. (It needs to be added to that cake cookbook!) I will definitely be trying it on a future birthday in our household. (Bus Nerd is next up, but he’s a pie man.) When I do, I’ll post photos (no matter how it turns out) here. If any of you try it before I do, be sure to report back.
Here’s the recipe for one 9×13 cake.
(I used 3 of these to get three 5.5″ x 13″ rectangles and then used the scraps to add the electric converter box on top. It really was a huge cake — it probably could have fed 30 people).Annie Rigg’s Basic Yellow Cake:
3 sticks unsalted butter, at room temp
2 cups sugar
6 large eggs, beaten
2 teaspoons vanilla extract
3 cups cake flour
5 teaspoons baking powder
4-5 tablespoons milk, at room tempPreheat the oven to 350ºF. Grease and place greased parchment paper in a 13×9 cake pan.
Cream the butter and sugar in electric mixer until pale, light and fluffy, about 2-3 mins. Very gradually add the beaten eggs, mixing well between each addition and scraping down the bowl with a spatula from time to time. Stir in the vanilla extract.
Sift together the flour and baking powder and add to the cake mixture in 2 batches, mixing until smooth. Add the milk and mix until smooth.
Pour into cake pan. Bake on the middle rack of preheated oven for 45 mins, or until a toothpick inserted in center comes out clean. Let the cake cool for ten minutes before turning out onto a wire cooling rack. Turn the cake right side up and let cool completely.
I used a Betty Crocker buttercream frosting — your favorite will do.
As the cakes were cooling, I mixed the food coloring into my frosting. I used the gel food coloring for more intense color (bought at a kitchen store, but I think you can find them at nicer grocery stores).
Blue + Green = Teal (for bus top)
Yellow + splash of Orange = Gold (for bus bottom and doors)
Black (for piping and line down center of bus)
Red (for small red stripe and metro writing)
Splash of Black = Grey (for windows)Once the cakes were cool, I used a serrated knife to level the tops of the cakes so they stacked nicely. I cut them into 5.5″ by 12″ rectangles, being careful to save the remainders for the electric converter box that went on top. I put frosting in between the layers to cement them in place. Then I cut a little wedge off the back of the bus so it tapered ever so gently. I took two 1″ x 4″ scraps and put them side by side and on top of the cake with frosting to make the electric converter box. I tapered the sides of these (cut off little wedges on front and back sides) so they lay on the cake at a 45 degree angle. Then I crumb coated it. This is just a fancy way of saying that I put a layer of frosting around the whole cake and then stuck it in the fridge for about an hour so that the surface of the cake would be easier to frost and wouldn’t get little bits of cake everywhere. Then, I used some photos I found on google images as a guide and I frosted it. (One tip — I used both a small and large offset spatula to crumb coat and to frost). Teal on the top, gold on the bottom, black stripe down the middle, gray windows, etc. For the thin lines I put the frosting in a plastic pastry bag and snipped off the tip to pipe the frosting. The frosting took a good couple of hours.
I then stuck Oreos on for wheels (I cut circles into the cake so that the oreos would fit in and would be flush against the cake) and frosted black lines along the bottom as a bumper. For the front bumper I used black licorice vines. I used giant yellow gumdrops cut into rectangles for headlights, and cut the small circular tip off orange gumdrops for parking lights. I used black licorice ropes for window washers and orange jellybeans for the little lights on the top of the bus. I used the bottom of large gumdrops for the taillights, red jellybeans for the little lights on top in the back and a licorice allsort for the tailpipe. Then I put two long candles in for the electric poles.
Hooray for Nicole (coolest mom ever) and my new (third) favorite BCiT, Max!
And so it begins
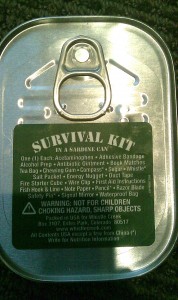
One more (or, MacGyver, eat your heart out)
I found this in one of Bus Nerd’s boxes when we were moving and had to have it. (Chaos enables pilfering, so I didn’t bother to tell him.) I zipped it in an inside pocket of the bus bag and almost forgot it was in there.
Is there a bus chick on Earth who could resist this? One never knows when a whistle, a compass, and some duct tape will come in handy.
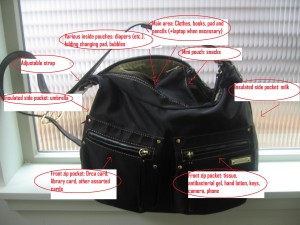
Bus chick preparedness, part III (or, Anatomy of a bus bag)
As I’ve mentioned before, bags are important to bus types. After footwear, a bus rider’s bag is probably the single most important accessory (equipment?) she owns. And yet, it’s been years since I’ve had one that worked well for me. Since Chicklet was born, I’ve been looking (not actively, but still) for a bag with the following attributes:
• Ability to carry baby/kid stuff and adult stuff
• Simple, but with enough compartments to make frequently used items easy to access
• Professional in appearance (for those times I’m traveling without children)
• Comfortable to wear with a baby in a pack
I finally bought a new bag in December. I let go of the last requirement, since I won’t be wearing Busling much longer (more on that very soon), and since all the bags-for-baby-wearing options I found seemed impractical for other purposes, not especially easy to use, and, um, ugly. The new bag has adjustable straps, which are useful but not as sturdy as they could be. (The adjustable strap was actually the source of my beloved pre-baby bus bag’s demise.) And, though it’s professional and reasonably attractive, it’s definitely not my style. All that said, so far, I’m mostly satisfied.
For those who’d like to know, here’s what I keep in it.
• At least one compact, age-appropriate book for each child. Since books are our most-common form of ride entertainment, I tend to rotate them frequently. (Thanks, SPL!) I don’t usually bring toys because they take up space, are easily dropped (try picking up a block from the bus floor with a baby and a bag on your lap), and don’t really entertain an antsy child anyway. Instead of worrying about bringing a lot of distractions, I take advantage of the built-in distractions of the bus, scenery, and fellow riders. It does require some effort (more on this later as well) but has so far worked for me.
• A small pad of paper and a box of erasable colored pencils for Chicklet. She uses them only occasionally when we’re out, but since they take up very little space and come in handy if I need to jot something down and my phone is not cooperating (see below), they’re worth including.
• Bubbles! These are great for passing the time waiting outside and (again) compact and portable. Just be sure not to mix them with the main contents of your bag.
• Non-perishable snacks. Busling is, for some reason, obsessed with raisins. Since they’re very portable and healthy (and also a favorite of Chicklet’s), they always go in the bag. I also usually bring some kind of granola/energy bars for Chicklet. These I save for times when she’s walked an especially long distance or we’ve stayed out longer than expected. She thinks of them as dessert, so they work well as bribes—I mean, good behavior encouragement. Oh, and sometimes I bring animal-shaped mini crackers. And teething biscuits.
• Diapers and associated paraphernalia (folding changing pad, wipes, lined “wet bag”)
• Minimal extra clothing. I bring pants and underwear for Chicklet—just in case a restroom emergency strikes when we’re not near a restroom—and an undershirt and one-piece outfit for Busling. (Chicklet now has her own bus bag and could theoretically carry her own extra clothes, but since we don’t always bring her bag, it works best for me to keep them in mine.) I’ve never actually had to use the extra garments, but I’m sure I’d have a need if I ever traveled without them.
• Umbrella. Yes, real Seattleites do carry them. Mine’s compact and has a cover (so I can avoid loss/wet-umbrella on the seat bus foul) and return it to my bag when wet. The good news is, my new bag has two waterproof, insulated hidden side pockets, so it’s OK if I lose the cover.
• Smart(ish) phone. My phone isn’t fancy (and honestly doesn’t work very well), but I mostly only use to tell time and find out when the next bus is coming. And, of course, for the occasional call.
• Wallet. It’s got the usual stuff: money, ID, library card, Orca card, and et cetera. I keep it in a very snug front pocket (tough for a thief to slip out) but perfect for effortless hip-taps on the Orca card reader.
• Keys
• Antibacterial gel. Ahem.
• Hand lotion
• Mini package of tissues
• Chapstick
• Gum. Hey, fellow passengers appreciate attention to these matters.
• Rain bonnet–just in case I put some effort into my hair
• Digital camera. You never know when you’ll pass a guy with a snowboard checking a schedule.
I keep this stuff in my bag at all times (restocking when necessary) and add only milk (which I keep in the other insulated side pocket) and a thermos of water at the last minute. This makes the ordeal of getting out of the house with two kids as simple as it can be.
All of this fits well and is easy to access, and the bag is not at all heavy. If I’m going out alone (to a meeting or some other business-related event), I can easily add my laptop without reconfiguring.
Your turn. What’s in your bus bag?
Westbound 2 stop (14th & Union), 10 PM
Northbound 1, 10:45 AM
The bus driver is talking relationships with the BDP (apparently, a regular passenger) in the seat nearest to him.
Driver: “You know what they say: If you can’t be with the one you love…”
BDP: “Love the one you’re with.”
Driver: “Yeah. Don’t tell her that, though. She’s the type that will kill the messenger.”

